How to see log changes by commit id

You can see git log by commit id via below terminal command, just you have to pass your git commit id and options. then you will see magic. git is very powerful tool. it track all changes and also manage your code version.

I am always using git. it is also help to keep save our code on cloud base. so we can access our code anywhere in this university.

git diff-tree -p yourcommitidhere

git show --color --pretty=format:%b yourcommitidhere

Magento 2 Zend Log

$writer = new \Zend_Log_Writer_Stream(BP . '/var/log/testlog.log');
$logger = new \Zend_Log();
$logger->addWriter($writer);
$logger->info('testt'); // Print string type data
$logger->info('Data::' . print_r($arrData, true)); // Print array type data

In magento 2 you can debug any code via above logger script.

Magento 2 getting error while creating ui_component

TypeError: get_parent_class(): Argument #1 ($object_or_class) must be an object or a valid class name, string given in /var/www/html/vendor/magento/framework/Code/Reader/ClassReader.php:98
Stack trace:
#0 /var/www/html/vendor/magento/framework/Code/Reader/ClassReader.php(98): get_parent_class()
#1 /var/www/html/vendor/magento/framework/View/Element/UiComponent/Argument/Interpreter/ConfigurableObject.php(142): Magento\Framework\Code\Reader\ClassReader->getParents()
#2 /var/www/html/vendor/magento/framework/View/Element/UiComponent/Argument/Interpreter/ConfigurableObject.php(105): Magento\Framework\View\Element\UiComponent\Argument\Interpreter\ConfigurableObject->getParents()
#3 /var/www/html/generated/code/Magento/Framework/Data/Argument/InterpreterInterface/Proxy.php(95): Magento\Framework\View\Element\UiComponent\Argument\Interpreter\ConfigurableObject->evaluate()
#4 /var/www/html/vendor/magento/framework/Data/Argument/Interpreter/Composite.php(61): Magento\Framework\Data\Argument\InterpreterInterface\Proxy->evaluate()
#5 /var/www/html/vendor/magento/module-ui/Config/Data.php(164): Magento\Framework\Data\Argument\Interpreter\Composite->evaluate()
#6 /var/www/html/vendor/magento/module-ui/Config/Data.php(167): Magento\Ui\Config\Data->evaluateComponentArguments()
#7 /var/www/html/vendor/magento/module-ui/Config/Data.php(111): Magento\Ui\Config\Data->evaluateComponentArguments()
#8 /var/www/html/vendor/magento/module-ui/Config/Data.php(136): Magento\Ui\Config\Data->initData()
#9 /var/www/html/vendor/magento/framework/View/Layout/Reader/UiComponent.php(100): Magento\Ui\Config\Data->get()
#10 /var/www/html/vendor/magento/framework/View/Layout/ReaderPool.php(105): Magento\Framework\View\Layout\Reader\UiComponent->interpret()
#11 /var/www/html/vendor/magento/framework/View/Layout/Reader/Container.php(84): Magento\Framework\View\Layout\ReaderPool->interpret()
#12 /var/www/html/vendor/magento/framework/View/Layout/ReaderPool.php(105): Magento\Framework\View\Layout\Reader\Container->interpret()
#13 /var/www/html/vendor/magento/framework/View/Page/Config/Reader/Body.php(68): Magento\Framework\View\Layout\ReaderPool->interpret()
#14 /var/www/html/vendor/magento/framework/View/Layout/ReaderPool.php(105): Magento\Framework\View\Page\Config\Reader\Body->interpret()
#15 /var/www/html/vendor/magento/framework/View/Layout.php(346): Magento\Framework\View\Layout\ReaderPool->interpret()
#16 /var/www/html/generated/code/Magento/Framework/View/Layout/Interceptor.php(32): Magento\Framework\View\Layout->generateElements()
#17 /var/www/html/vendor/magento/framework/View/Layout/Builder.php(129): Magento\Framework\View\Layout\Interceptor->generateElements()
#18 /var/www/html/vendor/magento/framework/View/Page/Builder.php(65): Magento\Framework\View\Layout\Builder->generateLayoutBlocks()
#19 /var/www/html/vendor/magento/framework/View/Layout/Builder.php(65): Magento\Framework\View\Page\Builder->generateLayoutBlocks()
#20 /var/www/html/vendor/magento/framework/View/Layout.php(271): Magento\Framework\View\Layout\Builder->build()
#21 /var/www/html/vendor/magento/framework/View/Layout.php(896): Magento\Framework\View\Layout->build()
#22 /var/www/html/vendor/magento/module-backend/Model/View/Result/Page.php(26): Magento\Framework\View\Layout->getBlock()
#23 /var/www/html/app/code/Codecryption/Inventory/Controller/Adminhtml/codecryption/Csvimport.php(37): Magento\Backend\Model\View\Result\Page->setActiveMenu()
#24 /var/www/html/vendor/magento/framework/Interception/Interceptor.php(58): Codecryption\Inventory\Controller\Adminhtml\codecryption\Csvimport->execute()
#25 /var/www/html/vendor/magento/framework/Interception/Interceptor.php(138): Codecryption\Inventory\Controller\Adminhtml\codecryption\Csvimport\Interceptor->___callParent()
#26 /var/www/html/vendor/magento/framework/Interception/Interceptor.php(153): Codecryption\Inventory\Controller\Adminhtml\codecryption\Csvimport\Interceptor->Magento\Framework\Interception\{closure}()
#27 /var/www/html/generated/code/Codecryption/Inventory/Controller/Adminhtml/codecryption/Csvimport/Interceptor.php(23): Codecryption\Inventory\Controller\Adminhtml\codecryption\Csvimport\Interceptor->___callPlugins()
#28 /var/www/html/vendor/magento/framework/App/Action/Action.php(111): Codecryption\Inventory\Controller\Adminhtml\codecryption\Csvimport\Interceptor->execute()
#29 /var/www/html/vendor/magento/module-backend/App/AbstractAction.php(151): Magento\Framework\App\Action\Action->dispatch()
#30 /var/www/html/vendor/magento/framework/Interception/Interceptor.php(58): Magento\Backend\App\AbstractAction->dispatch()
#31 /var/www/html/vendor/magento/framework/Interception/Interceptor.php(138): Codecryption\Inventory\Controller\Adminhtml\codecryption\Csvimport\Interceptor->___callParent()
#32 /var/www/html/app/code/WeltPixel/Backend/Plugin/Utility.php(76): Codecryption\Inventory\Controller\Adminhtml\codecryption\Csvimport\Interceptor->Magento\Framework\Interception\{closure}()
#33 /var/www/html/vendor/magento/framework/Interception/Interceptor.php(135): WeltPixel\Backend\Plugin\Utility->aroundDispatch()
#34 /var/www/html/vendor/magento/module-backend/App/Action/Plugin/Authentication.php(145): Codecryption\Inventory\Controller\Adminhtml\codecryption\Csvimport\Interceptor->Magento\Framework\Interception\{closure}()
#35 /var/www/html/vendor/magento/framework/Interception/Interceptor.php(135): Magento\Backend\App\Action\Plugin\Authentication->aroundDispatch()
#36 /var/www/html/vendor/magento/framework/Interception/Interceptor.php(153): Codecryption\Inventory\Controller\Adminhtml\codecryption\Csvimport\Interceptor->Magento\Framework\Interception\{closure}()
#37 /var/www/html/generated/code/Codecryption/Inventory/Controller/Adminhtml/codecryption/Csvimport/Interceptor.php(32): Codecryption\Inventory\Controller\Adminhtml\codecryption\Csvimport\Interceptor->___callPlugins()
#38 /var/www/html/vendor/magento/framework/App/FrontController.php(245): Codecryption\Inventory\Controller\Adminhtml\codecryption\Csvimport\Interceptor->dispatch()
#39 /var/www/html/vendor/magento/framework/App/FrontController.php(212): Magento\Framework\App\FrontController->getActionResponse()
#40 /var/www/html/vendor/magento/framework/App/FrontController.php(147): Magento\Framework\App\FrontController->processRequest()
#41 /var/www/html/vendor/magento/framework/Interception/Interceptor.php(58): Magento\Framework\App\FrontController->dispatch()
#42 /var/www/html/vendor/magento/framework/Interception/Interceptor.php(138): Magento\Framework\App\FrontController\Interceptor->___callParent()
#43 /var/www/html/vendor/magento/framework/Interception/Interceptor.php(153): Magento\Framework\App\FrontController\Interceptor->Magento\Framework\Interception\{closure}()
#44 /var/www/html/generated/code/Magento/Framework/App/FrontController/Interceptor.php(23): Magento\Framework\App\FrontController\Interceptor->___callPlugins()
#45 /var/www/html/vendor/magento/framework/App/Http.php(116): Magento\Framework\App\FrontController\Interceptor->dispatch()
#46 /var/www/html/vendor/magento/framework/App/Bootstrap.php(264): Magento\Framework\App\Http->launch()
#47 /var/www/html/pub/index.php(30): Magento\Framework\App\Bootstrap->run()
#48 {main}
Solution : 
in my case, the problem was that the class path was incorrectly specified.Go to your ui_component file and in < dataSource > check < argument name="class" >This should be the class path!< /argument> I corrected it to the correct one and it worked for me. If this helped you - let me know

How to create swap file in ubuntu linux

Step 1 – Checking the System for Swap Information: Before proceeding, it’s essential to check if the system already has swap space available. You can do this by typing the following command:

sudo swapon --show

If you don’t get any output, it means your system currently does not have any swap space configured.

You can also verify the absence of active swap by using the free utility:

free -h

If the output shows “Swap: 0B,” it confirms that no swap is currently active on the system.

Step 2 – Checking Available Space on the Hard Drive Partition: Before creating a new swap file, ensure that your current disk usage provides enough space. To do this, enter the command:

df -h

Review the output and identify the device with “/” in the “Mounted on” column. You should have enough free space on this partition to create a swap file.

Step 3 – Creating a Swap File: Now that we have verified available space, we can create a swap file in the root (“/”) directory. We’ll use the fallocate program for this purpose, as it efficiently allocates the required space:

sudo fallocate -l 1G /swapfile

The above command creates a 1GB swap file. Adjust the size according to your system’s needs.

Step 4 – Enabling the Swap File: After creating the swap file, we need to set it up as actual swap space. To ensure security, we’ll restrict access to the file to only the root user:

sudo chmod 600 /swapfile

Next, mark the file as swap space:

sudo mkswap /swapfile

Finally, enable the swap file, allowing the system to start using it:

sudo swapon /swapfile

Verify that the swap is active by running:

sudo swapon --show

Step 5 – Making the Swap File Permanent: To retain the swap settings after a reboot, add the swap file information to the “/etc/fstab” file:

echo '/swapfile none swap sw 0 0' | sudo tee -a /etc/fstab

This ensures that the swap file is automatically activated on system startup.

Step 6 – Tuning your Swap Settings: You can optimize your swap behavior by adjusting the swappiness and vfs_cache_pressure parameters. Lowering swappiness will reduce swapping to disk, while adjusting vfs_cache_pressure allows better caching of filesystem data.

To view the current swappiness value:

cat /proc/sys/vm/swappiness

To set a new swappiness value (e.g., 10):

sudo sysctl vm.swappiness=10

To make the change persistent, add this line to “/etc/sysctl.conf”:

vm.swappiness=10

Similarly, to check the current vfs_cache_pressure value:

cat /proc/sys/vm/vfs_cache_pressure

To set a new value (e.g., 50):

sudo sysctl vm.vfs_cache_pressure=50

For persistence, add this line to “/etc/sysctl.conf”:

vm.vfs_cache_pressure=50

Conclusion: Following these steps will set up and optimize swap space on your system, providing additional memory resources when needed. Remember that swap space is useful in avoiding out-of-memory issues, but it’s essential to optimize your applications and consider server upgrades if you encounter frequent memory problems.

Magento 2 Gym Extention

We are inventing new plugin for magento 2. It would manage your gym members and also provide you member fee pending for month.

Git repo : https://github.com/puneetk00/mg2gym

Key features.

  1. Registration of Gym members.
  2. Attendance of Gym members.
  3. Fee received/pending of month report.
  4. Coupons form gym members.
  5. Card RFID for attendance.

If you want to suggest any other features please comment on blog. Or send me message on puneetk00@gmail.com with sub : magento 2 gym plugin.

Composer switch 2 to 1

To switch the version of Composer from version 2 to version 1, you can use the following command:

luaCopy codecomposer self-update --1

This command will update your current version of Composer to the latest available version in the 1.x series. Keep in mind that the syntax might vary depending on the specific version of Composer and the package manager on your system. Always check the official documentation for the most up-to-date information.

magento marketplace

Magento Marketplace is an online platform that serves as a hub for the buying and selling of extensions, themes, and other software solutions specifically designed for Magento, an open-source e-commerce platform. Launched as an official extension store by Magento, the marketplace offers a vast array of add-ons and customizations that enhance the functionality and appearance of Magento-powered online stores.

Developers and companies can submit their creations to the Magento Marketplace, subject to a strict review process to ensure quality, security, and compatibility with the latest versions of Magento. This stringent evaluation guarantees that customers can confidently choose from a selection of reliable and well-built extensions for their e-commerce ventures.

For merchants using Magento, the marketplace presents a convenient and centralized location to explore, purchase, and install various extensions that align with their unique business requirements. These extensions can span diverse categories such as payment gateways, shipping modules, marketing tools, analytics integrations, and more. Additionally, the marketplace offers themes to enhance the store’s appearance and create a seamless shopping experience for customers.

The Magento Marketplace benefits both developers and store owners. Developers gain exposure for their products, access to a large customer base, and potential revenue through sales and subscriptions. On the other hand, merchants can easily extend their store’s functionality without extensive development work, saving time and resources while tailoring their online businesses to suit their needs.

Overall, Magento Marketplace plays a vital role in the Magento ecosystem, fostering collaboration and innovation while empowering e-commerce businesses to flourish with the help of a diverse range of high-quality extensions and themes.

Magento: Unraveling the E-Commerce Powerhouse – History, Versions, and 7 Reasons to Use It for Your Business

Introduction

In the ever-evolving digital landscape, e-commerce has emerged as a driving force in the world of business. Among the various e-commerce platforms, Magento has stood out as a robust and flexible solution, empowering businesses to create and manage their online stores with ease. In this article, we delve into the history of Magento, explore its different versions, and present seven compelling reasons why your business should consider using this powerful platform.

  1. The History of Magento

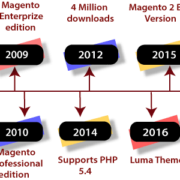
Magento was founded in 2007 by Roy Rubin and Yoav Kutner, with the first public beta version released in August 2007. The platform quickly gained popularity due to its open-source nature, enabling developers to customize and extend its functionalities according to their specific requirements. Magento’s user-friendly interface and powerful features soon made it a preferred choice for small businesses, enterprises, and even multinational corporations.

  1. Versions of Magento

Over the years, Magento has gone through several major releases, each introducing new features and improvements. Here are some key versions of Magento:

  • Magento 1: This initial version provided a solid foundation for e-commerce businesses and quickly became the leading open-source e-commerce platform. It received regular updates and support until its end of life in June 2020.
  • Magento 2: Launched in 2015, Magento 2 was a significant step forward, addressing many of the limitations of its predecessor. It offered improved performance, scalability, and security. With a more intuitive admin interface and enhanced mobile responsiveness, Magento 2 became a preferred choice for businesses.
  1. 7 Reasons to Use Magento for Your Business

a. Flexibility and Customization: Magento’s open-source nature allows businesses to tailor their online stores to their specific needs. From personalized themes to third-party integrations, the platform offers limitless possibilities for customization.

b. Scalability: Whether you are a startup or an enterprise-level business, Magento scales effortlessly with your growth. It can handle thousands of products and a high volume of transactions without compromising on performance.

c. Robust Feature Set: Magento comes packed with a wide range of built-in features, such as advanced product catalog management, multiple payment gateways, SEO tools, and international support, empowering businesses to create a feature-rich online store.

d. Mobile Responsiveness: In today’s mobile-driven world, having a responsive website is crucial. Magento ensures that your online store looks and functions flawlessly across various devices, enhancing the user experience and increasing conversions.

e. SEO-Friendly: Magento is designed with search engine optimization (SEO) best practices in mind. Its clean code structure and SEO features enable better visibility in search engine results, driving organic traffic to your store.

f. Community and Support: With a large community of developers and users, Magento enjoys continuous updates, security patches, and extensive support resources. The community actively contributes to the platform’s growth and addresses issues promptly.

g. Integration Capabilities: Magento integrates seamlessly with numerous third-party applications, including payment gateways, shipping providers, and marketing tools. This makes it easier to streamline your business operations and enhance overall efficiency.

Conclusion

Magento has undoubtedly proven itself as a powerhouse in the e-commerce realm. Its history of continuous improvement, combined with the diverse range of features and customization options, makes it an ideal choice for businesses of all sizes. Whether you’re starting a new online venture or seeking to upgrade your existing e-commerce platform, Magento offers the tools and support necessary to succeed in today’s competitive digital landscape. Embrace the power of Magento and unlock the full potential of your e-commerce business.

How to install PHP 7.3 on Ubuntu 20.04

To install PHP 7.3 on Ubuntu 20.04, you’ll need to use a third-party repository since PHP 7.3 is not available in the default Ubuntu repositories. Here are the steps to install PHP 7.3:

  1. Update the package list and install software-properties-common:
sudo apt update
sudo apt install software-properties-common
  1. Add the Ondrej PHP repository, which provides different PHP versions:
sudo add-apt-repository ppa:ondrej/php
  1. Update the package list again after adding the repository:
sudo apt update
  1. Install PHP 7.3 and the necessary modules:
sudo apt install php7.3
sudo apt install php7.3-cli php7.3-fpm php7.3-mysql php7.3-curl php7.3-gd php7.3-mbstring php7.3-xml php7.3-zip
  1. Once the installation is complete, you can check the installed PHP version:
php -v
  1. If you have other PHP versions installed, you can switch between them using the update-alternatives command. For example, to switch to PHP 7.3:
sudo update-alternatives --set php /usr/bin/php7.3
sudo update-alternatives --set phar /usr/bin/phar7.3
sudo update-alternatives --set phar.phar /usr/bin/phar.phar7.3
  1. Restart the PHP-FPM service to apply changes (if you installed php7.3-fpm):
sudo systemctl restart php7.3-fpm

That’s it! You now have PHP 7.3 installed on your Ubuntu 20.04 system.

Magento2 password reset URL

You can replace your domain with example.com and copy token from database customer_entity table rp token and customer id then you can directly reset password of customer.

http://example.com/customer/account/createPassword/?id=7705&token=yLv84OIUBprrez4VXmIGy09nlwNPqOIS