Magento: Unraveling the E-Commerce Powerhouse – History, Versions, and 7 Reasons to Use It for Your Business

Introduction

In the ever-evolving digital landscape, e-commerce has emerged as a driving force in the world of business. Among the various e-commerce platforms, Magento has stood out as a robust and flexible solution, empowering businesses to create and manage their online stores with ease. In this article, we delve into the history of Magento, explore its different versions, and present seven compelling reasons why your business should consider using this powerful platform.

  1. The History of Magento

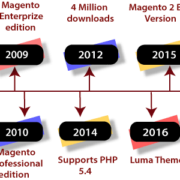
Magento was founded in 2007 by Roy Rubin and Yoav Kutner, with the first public beta version released in August 2007. The platform quickly gained popularity due to its open-source nature, enabling developers to customize and extend its functionalities according to their specific requirements. Magento’s user-friendly interface and powerful features soon made it a preferred choice for small businesses, enterprises, and even multinational corporations.

  1. Versions of Magento

Over the years, Magento has gone through several major releases, each introducing new features and improvements. Here are some key versions of Magento:

  • Magento 1: This initial version provided a solid foundation for e-commerce businesses and quickly became the leading open-source e-commerce platform. It received regular updates and support until its end of life in June 2020.
  • Magento 2: Launched in 2015, Magento 2 was a significant step forward, addressing many of the limitations of its predecessor. It offered improved performance, scalability, and security. With a more intuitive admin interface and enhanced mobile responsiveness, Magento 2 became a preferred choice for businesses.
  1. 7 Reasons to Use Magento for Your Business

a. Flexibility and Customization: Magento’s open-source nature allows businesses to tailor their online stores to their specific needs. From personalized themes to third-party integrations, the platform offers limitless possibilities for customization.

b. Scalability: Whether you are a startup or an enterprise-level business, Magento scales effortlessly with your growth. It can handle thousands of products and a high volume of transactions without compromising on performance.

c. Robust Feature Set: Magento comes packed with a wide range of built-in features, such as advanced product catalog management, multiple payment gateways, SEO tools, and international support, empowering businesses to create a feature-rich online store.

d. Mobile Responsiveness: In today’s mobile-driven world, having a responsive website is crucial. Magento ensures that your online store looks and functions flawlessly across various devices, enhancing the user experience and increasing conversions.

e. SEO-Friendly: Magento is designed with search engine optimization (SEO) best practices in mind. Its clean code structure and SEO features enable better visibility in search engine results, driving organic traffic to your store.

f. Community and Support: With a large community of developers and users, Magento enjoys continuous updates, security patches, and extensive support resources. The community actively contributes to the platform’s growth and addresses issues promptly.

g. Integration Capabilities: Magento integrates seamlessly with numerous third-party applications, including payment gateways, shipping providers, and marketing tools. This makes it easier to streamline your business operations and enhance overall efficiency.

Conclusion

Magento has undoubtedly proven itself as a powerhouse in the e-commerce realm. Its history of continuous improvement, combined with the diverse range of features and customization options, makes it an ideal choice for businesses of all sizes. Whether you’re starting a new online venture or seeking to upgrade your existing e-commerce platform, Magento offers the tools and support necessary to succeed in today’s competitive digital landscape. Embrace the power of Magento and unlock the full potential of your e-commerce business.

Loading External ES6 Script Modules in Magento 2 Ecommerce

How to load external es6 script module in Magento 2 Ecommerce

To add a script with type="module" in Magento, you can follow the alternative approach you mentioned:

  1. Create a custom block class in your module or theme. For example, let’s say you have a module called Your_Module:
php
<?php namespace YourModuleBlock; use MagentoFrameworkViewElementTemplate; class CustomScript extends Template { protected $_template = 'Your_Module::custom_script.phtml'; }
  1. Create the corresponding template file custom_script.phtml in your module or theme’s template directory. For example:
bash
app/code/Your/Module/view/frontend/templates/custom_script.phtml
  1. In the custom_script.phtml file, add your script tag with the type="module" attribute:
html
<script type="module"> // Your ES6 module code here </script>
  1. In your layout XML file (e.g., default.xml), add the following code to include the custom block in the head section:
xml
<head> <block class="YourModuleBlockCustomScript" name="custom_script" template="Your_Module::custom_script.phtml" /> </head>
  1. Finally, flush the cache to apply the changes.

With this approach, the custom block will be rendered in the head section of the HTML, and the script with type="module" will be included.

Please adjust the code according to your module or theme’s structure and naming conventions.

I apologize for any confusion caused earlier, and I appreciate your clarification.

Puneet Kumar Magento Developer

Exception Handling in Magento 2 Admin: Throwing and Handling Custom Exceptions during Configuration Save


To throw an exception during the process of saving configuration in Magento 2 Admin, you can follow the below approach:

php
use MagentoFrameworkExceptionLocalizedException; try { // Your configuration save logic here // If the configuration save is unsuccessful, throw an exception if (!$success) { throw new LocalizedException(__('Unable to save the configuration.')); } // If the configuration save is successful, perform any necessary actions // ... // Redirect the user to a success page or display a success message // ... } catch (LocalizedException $e) { // Handle the exception, log or display an error message as needed $errorMessage = $e->getMessage(); // ... }

In this example, you should replace the comment Your configuration save logic here with your actual code for saving the configuration in the Magento 2 Admin area.

If the configuration save process encounters an error or condition that prevents successful saving, you can throw a LocalizedException using the throw new LocalizedException(__('Your error message.')); statement. Customize the error message as per your requirement.

In the catch block, you can handle the thrown exception by catching the LocalizedException and perform any necessary error handling or logging. You can access the error message using $e->getMessage().

Remember to adjust the code and add any additional logic or error handling specific to your use case.

Using this approach, you can effectively throw an exception during the Magento 2 Admin configuration save process and handle it accordingly.

Puneet Kumar Magento Developer

Magento 2 core connect select the row and rename field and also performed sum minus all conditions

 Certainly! Based on your requirements, here’s an updated code snippet that performs the sum and subtraction of two fields with conditions applied:

php
$select = $adapter->select() ->from( ['c' => $tableName], [ '*', 'sum_field' => new Zend_Db_Expr('c.qty + c.sale_qty'), 'diff_field' => new Zend_Db_Expr('c.qty - c.sale_qty') ] ) ->where('c.qty > ?', $qtyThreshold) // Apply a condition on c.qty field ->where('c.sale_qty > ?', $saleQtyThreshold); // Apply a condition on c.sale_qty field

In the above code, I’ve added two new aliases, sum_field and diff_field, to represent the sum and subtraction of qty and sale_qty fields, respectively. Additionally, I’ve included conditions on both qty and sale_qty fields using the where() method. Please replace $qtyThreshold and $saleQtyThreshold with your desired values for the conditions.

Make sure to replace $adapter with your database adapter instance and $tableName with the actual name of the table you are querying.

After executing the select query, you can retrieve the result using the aliases sum_field and diff_field from the query result.

Puneet Kumar Magento Developer

Magento 2 Tutorial For Beginners


 Magento 2 Tutorial for Beginners: https://www.youtube.com/channel/UChb7DM9SspzrUVh4hnWL50A


  1. Introduction to Magento 2:

    • Overview of Magento 2 and its features.
    • Understanding the benefits of using Magento 2 for eCommerce development.
  2. Installation and Setup:

    • Installing Magento 2 on your local development environment.
    • Configuring the necessary server requirements.
    • Setting up a database for Magento 2.
  3. Magento 2 Architecture:

    • Understanding the architecture of Magento 2.
    • Exploring the file structure and directory hierarchy.
    • Learning about the different components and modules in Magento 2.
  4. Creating a Magento 2 Store:

    • Configuring the basic settings of your Magento 2 store.
    • Managing themes and layouts.
    • Adding products, categories, and attributes.
  5. Customizing the Store:

    • Customizing the appearance with themes and templates.
    • Extending functionality with Magento 2 extensions and modules.
    • Managing customer groups and user roles.
  6. Managing Orders and Customers:

    • Processing orders and managing inventory.
    • Handling customer registrations and accounts.
    • Configuring shipping and payment methods.
  7. Performance Optimization:

    • Optimizing Magento 2 for better performance and scalability.
    • Caching techniques and strategies.
    • Implementing server-side optimizations.
  8. Magento 2 Development:

    • Introduction to Magento 2 development concepts.
    • Creating custom modules and extensions.
    • Working with Magento APIs and web services.
  9. Testing and Deployment:

    • Testing your Magento 2 store for functionality and performance.
    • Deploying your Magento 2 store to a production environment.
    • Monitoring and maintaining your Magento 2 store.
  10. Resources and Further Learning:

    • Exploring additional resources and documentation for Magento 2.
    • Joining Magento communities and forums for support and collaboration.
    • Continuing your learning journey with advanced Magento 2 topics.

Remember, this is just a general outline for a Magento 2 tutorial for beginners. Each topic can be further expanded with detailed explanations, examples, and hands-on exercises to provide a comprehensive learning experience.

Puneet Kumar Magento Developer

“Is it possible to enable the ‘Use Flat Catalog Category’ option on a per-store basis in Magento 2?


 “Is it possible to enable the ‘Use Flat Catalog Category’ option on a per-store basis in Magento 2? If not, what are the alternative approaches to optimize category performance for specific stores?”

In Magento 2, it is not possible to enable the “Use Flat Catalog Category” option on a per-store basis. This option is a global setting that affects the entire Magento installation, impacting all stores.

However, there are alternative approaches to optimize category performance for specific stores in Magento 2. Here are a few strategies you can consider:

  1. Caching: Implement full-page caching solutions, such as Varnish or built-in Magento cache, to improve the performance of category pages across all stores.

  2. Server Optimization: Ensure your server is properly configured and optimized for performance. This includes using a high-quality hosting provider, optimizing server settings, and leveraging caching mechanisms.

  3. Content Delivery Network (CDN): Utilize a CDN to deliver static content, such as images, CSS, and JavaScript, from geographically distributed servers, reducing the load on your main server and improving page load times.

  4. Lazy Loading: Implement lazy loading for images and other media on category pages, so that they load only when they become visible to the user, improving initial page load times.

  5. Minify and Combine CSS/JS: Minify and combine your CSS and JavaScript files to reduce the number of HTTP requests and improve overall page load speed.

  6. Optimize Images: Optimize images by compressing them without compromising quality. Use appropriate image formats and sizes to minimize their impact on page load times.

  7. Indexing: Ensure that your category and product indexes are up to date. Run regular index updates to ensure fast and accurate data retrieval for category pages.

  8. Use Caching Extensions: Explore Magento extensions that provide advanced caching options and optimizations specifically designed to enhance category page performance.

By implementing these alternative approaches, you can optimize the category performance for specific stores in Magento 2, even without the ability to enable the “Use Flat Catalog Category” option on a per-store basis.

Puneet Kumar Magento Developer

Creating Customized Order Confirmation Email Templates for Users and Store Owners in Magento 2


To create separate order confirmation email templates with different content for the user and store owner in Magento 2, you can follow these steps:

  1. Log in to your Magento 2 admin panel.

  2. Navigate to Marketing > Communications > Email Templates.

  3. Click on the Add New Template button.

  4. In the Template Information section, choose the Template Subject for the email. For example, “Order Confirmation for User” or “Order Confirmation for Store Owner.”

  5. Select the Template Content section and choose the desired Template Type. For order confirmation emails, you can select “New Order Confirmation Template.”

  6. Enter a Template Name for easy identification. For example, “Order Confirmation User” or “Order Confirmation Store Owner.”

  7. In the Template Content field, customize the email content according to your requirements. You can use variables like {{var order.getCustomerName()}}, {{var order.increment_id}}, and other available variables to personalize the email content.

  8. If you want to create a separate template for the store owner, you can create another template following the same steps and customize the content specifically for them.

  9. After customizing the content for both templates, click on the Save Template button to save your changes.

  10. Next, go to Stores > Configuration.

  11. In the Configuration panel, expand the Sales section and click on Sales Emails.

  12. Expand the Order section, and under the Order Confirmation Email setting, select the appropriate template for both the “Order Confirmation Email Sender” and “Order Confirmation Email Template” options. Choose the user template for the customer-related fields and the store owner template for the store owner-related fields.

  13. Save the configuration.

With these steps, you have created separate order confirmation email templates with different content for the user and store owner in Magento 2. The customized templates will be used accordingly when sending order confirmation emails. Remember to test the email notifications to ensure that the templates are working as intended.

Note: The specific options and configurations may vary slightly depending on the version of Magento 2 you are using. It’s recommended to refer to the official Magento 2 documentation or consult with a Magento developer for more detailed guidance tailored to your specific version and customization needs.

Puneet Kumar Magento Developer

To call a static block into a GraphQL query in the Alpine.js framework within Magento 2, you would need to follow these steps:

To call a static block into a GraphQL query in the Alpine.js framework within Magento 2, you would need to follow these steps:

  1. Create a GraphQL query:

    • Define your query in the app/code/{Vendor}/{Module}/etc/graphql/schema.graphqls file. For example:


Puneet Kumar Magento Developer

How to create multiple store in Magento 2? | Step-by-Step Guide: Creating Multiple Stores in Magento 2 | magento 2 demo


If you require then I can give you magento 2 demo.

To create multiple stores in Magento 2, you can follow these steps:

  1. Log in to your Magento 2 admin panel.

  2. Navigate to the Stores menu and select All Stores.

  3. Click on the Create Store button.

  4. In the Create Store dialog box, enter the Store Name and Store Code. The Store Code should be a unique identifier for the store.

  5. Select the Website that the store will be associated with. If you haven’t created a website yet, you can create one by going to Stores > All Stores > Create Website.

  6. Choose the Root Category for the store. This will determine the catalog and product listings shown in the store.

  7. Save the store configuration.

  8. To create a store view, go to Stores > All Stores and click on the Create Store View button.

  9. Provide a Store View Name and Store View Code. The Store View Code should be unique.

  10. Select the Store that the store view will be associated with.

  11. Choose the Locale and the Timezone for the store view.

  12. Save the store view configuration. Than you can see magento 2 demo.

Repeat these steps as needed to create multiple stores and store views in Magento 2. Each store can have its own unique configuration, catalog, and storefront design. Make sure to configure the necessary settings for each store, such as currencies, languages, and pricing, according to your business requirements.

Note: Creating multiple stores in Magento 2 can be a complex process, especially if you have specific customization needs or require advanced configurations. It is recommended to refer to the official Magento 2 documentation or consult with a Magento developer for more detailed guidance tailored to your specific requirements.

you can try these steps on your magento 2 demo store.

Puneet Kumar Magento Developer